Complete guide: from board to Home Assistant
For anyone hearing about ESP32 for the first time. What the board is, where to get it, how to flash EF-Bridge, and how to connect your Stream 2 to MQTT, a REST API and Home Assistant.
What is the ESP32-C3
The ESP32-C3 is a tiny microcontroller (a matchbox-sized mini-computer) with built-in Wi-Fi and Bluetooth. This is what EF-Bridge runs on: the board talks to your EcoFlow Stream 2 over Bluetooth, reads its telemetry and serves it to your home network as a web dashboard, a REST API and MQTT.
No soldering, no coding required. All you need is one ready-made board and a USB cable — the firmware does the rest.
What it looks like
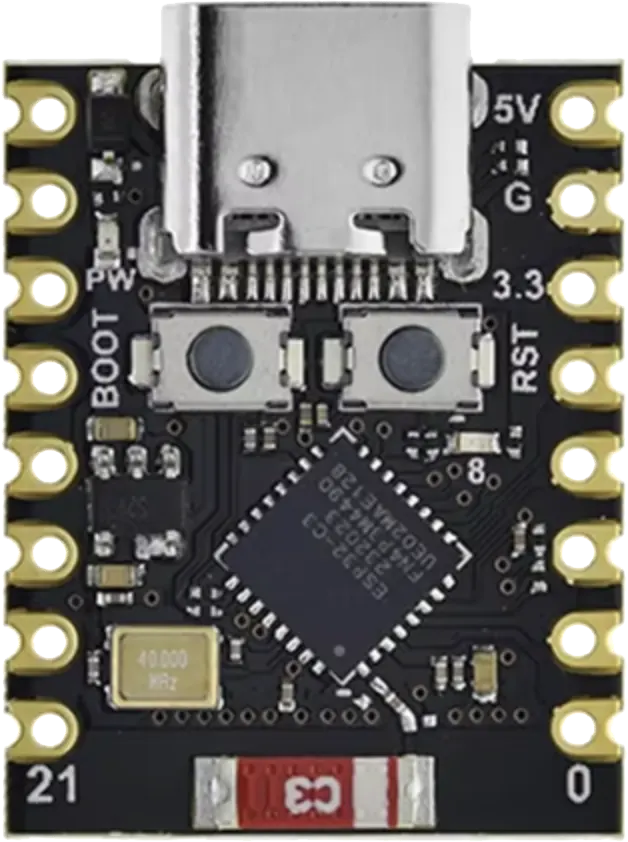
An ESP32-C3 SuperMini board — roughly 22×18 mm. USB-C connector on top, rows of pins along the sides, and next to the USB port a BOOT button and an RST (reset) button. The BOOT button is the one you need for flashing.
Where to get it
Any board based on the ESP32-C3 chip works. The most popular and cheapest is the “ESP32-C3 SuperMini”, around $2–4. If you plan to place the board far from the Stream 2 or your Wi-Fi router/access point, get the version with an external antenna (IPEX/u.FL connector + antenna) — it noticeably extends Bluetooth and Wi-Fi range.
- AliExpress — search “ESP32-C3 SuperMini” (cheapest, slower shipping).
- Amazon / eBay — “ESP32-C3 SuperMini”, often sold in 3–5 packs.
- For placement far from the router — the “ESP32-C3 SuperMini” version with an external antenna.
How to flash EF-Bridge
“Flashing” means writing the EF-Bridge program into the board's memory. It's done right in your browser — no Arduino IDE, no drivers, no command line.
What you need
- An ESP32-C3 board and a USB cable (important: a data cable, not a charge-only one).
- A computer with a modern browser — flashing runs right in the browser.
- The install page: ef-bridge.com/install/
Step by step
- Plug the ESP32-C3 board into your computer with the USB cable.
- Open ef-bridge.com/install/ in your browser and click “Install”.
- In the pop-up, select your board's port (usually “USB JTAG/serial” or “USB Serial”) and click “Connect”.
- Confirm the install — the progress bar reaches 100% in 1–2 minutes. Don't unplug the cable during this.
- When done, the board reboots and creates a “Stream2-Setup-XXXX” Wi-Fi hotspot.
First-time setup (wizard)
Wi-Fi and settings aren't hard-coded — everything goes through a step-by-step wizard on first boot:
- Connect your phone to the “Stream2-Setup-XXXX” Wi-Fi — the wizard opens by itself. If not, open http://192.168.4.1/ in a browser.
- Wi-Fi step: scan networks, pick yours, enter the password.
- Device step: “Find devices” → pick your Stream 2 from the Bluetooth results → give it a name.
- Account & extras: EcoFlow email/password (password isn't stored); optionally static IP, MQTT/Home Assistant, a dashboard password.
Device REST API
EF-Bridge serves data and takes commands over plain HTTP — handy for scripts, Node-RED, home automation and any custom integration. The base URL is the device address on your network, e.g. http://stream2.local/ or by IP.
Current Stream 2 telemetry as JSON — updated every second.
// GET http://stream2.local/api/telemetry
{
  "ready": true,        // BLE link to Stream 2 is active
  "pv1": 412.0,       // PV1, W
  "pv2": 386.0,       // PV2, W
  "gridPower": 640.0, // grid feed-in, W
  "vac": 231.4,       // grid voltage, V
  "iac": 2.77,        // current, A
  "freq": 50.01,      // frequency, Hz
  "pv1v": 34.2,       // PV1 voltage, V
  "pv2v": 33.8,       // PV2 voltage, V
  "temp": 41,          // inverter temperature, °C
  "rssi": -58,        // Stream 2 Wi-Fi RSSI, dBm
  "limit": 650,        // current power limit, W
  "genToday": 5.812,  // generation today, kWh
  "genTotal": 128.44, // generation total, kWh
  "feedToday": 4.9,   // fed to grid today, kWh
  "feedTotal": 96.2,  // fed to grid total, kWh
  "espRssi": -49       // ESP32 Wi-Fi RSSI, dBm
}
Fields with no available value are returned as null. ready=false means the Bluetooth link to the inverter isn't established yet.
State of the bridge itself: uptime, IP, BLE and MQTT status, free memory.
{
  "uptime": 83145,          // uptime, s
  "wifiRssi": -49,          // ESP32 RSSI, dBm
  "ip": "192.168.1.42",
  "bleConnected": true,
  "bleReady": true,
  "reconnects": 2,
  "mqtt": true,
  "freeHeap": 142880,
  "name": "stream2",
  "apName": "Stream2-Setup-AB12"
}Generation history: a JSON array of average power values (W) at 5-minute steps, up to 288 points (24 hours).
Set the power limit (W). The simplest way — a plain link / GET request.
Same thing, request body watts=NNN (or just a number).
# Set the limit to 650 W (GET, simplest)
curl "http://stream2.local/api/setpower?watts=650"

# Same via POST
curl -X POST "http://stream2.local/api/limit" -d "watts=650"MQTT
MQTT is a lightweight publish/subscribe protocol for smart homes. EF-Bridge publishes telemetry to your MQTT broker (e.g. Mosquitto) and listens for limit commands. Home Assistant integration runs over MQTT.
Enable it in the setup wizard or on the “Settings” page: broker address, port (default 1883), and username/password if needed.
Topics
| Topic | Dir | Description |
|---|---|---|
nodes/<name>/state | pub | Telemetry as JSON (retained), published periodically. |
nodes/<name>/status | pub | Availability: online / offline (offline is set automatically on disconnect — LWT). |
nodes/<name>/limit/set | sub | Limit command: send the wattage as plain text. |
In the topics, name is your device name from settings reduced to latin letters/digits (e.g. stream2). The exact name is shown on the Diagnostics page.
state payload
A single retained JSON with all metrics:
# topic: nodes/stream2/state  (retained)
{
  "ready": true,
  "gridPower": 640.0,
  "pv1": 412.0,
  "pv2": 386.0,
  "vac": 231.4,
  "freq": 50.01,
  "temp": 41,
  "rssi": -58,
  "limit": 650,
  "genToday": 5.812,
  "genTotal": 128.440,
  "feedToday": 4.900
}
Changing the limit
Publish the wattage (0–3000) to the command topic:
# Set the limit to 500 W over MQTT
mosquitto_pub -h 192.168.1.10 -t "nodes/stream2/limit/set" -m "500"Home Assistant integration
The easiest path is over MQTT: EF-Bridge uses auto-discovery (MQTT Discovery), so all sensors and the limit control appear in Home Assistant by themselves — no YAML editing.
Prerequisites
- A working MQTT broker (easiest: the Mosquitto broker add-on in Home Assistant).
- The MQTT integration installed in Home Assistant (Settings → Devices & Services → MQTT).
Step by step
- In EF-Bridge settings, enable MQTT: your broker's address and port, and login/password if any.
- Make sure “Home Assistant discovery” is checked.
- Save — the device connects to the broker and publishes its discovery config.
- In Home Assistant open Settings → Devices & Services → MQTT — a new “Stream 2” device appears with all entities.
Entities you'll get
Names start with your device name. Rough list:
| Home Assistant | Description |
|---|---|
sensor.*_grid_feed_power | Grid feed-in power, W |
sensor.*_pv1_power / _pv2_power | Generation on PV1 and PV2 inputs, W |
sensor.*_grid_voltage / _grid_frequency | Grid voltage (V) and frequency (Hz) |
sensor.*_inverter_temp | Inverter temperature, °C |
sensor.*_device_rssi | Stream 2 Wi-Fi signal, dBm |
sensor.*_generation_today / _total | Generation today and lifetime, kWh |
sensor.*_feed_in_today | Fed to grid today, kWh |
number.*_power_limit | Power-limit control (slider 0–800 W, step 10) — controllable from HA |
Automation example
For example, if a smart meter at your house inlet detects excess generation (export to the grid), you can lower the limit to keep net export at zero:
# Zero export: reduce feed-in based on a smart meter at the house inlet
# sensor.house_grid_power: >0 = importing, <0 = exporting
automation:
  - alias: Stream2 zero export
    trigger:
      - platform: state
        entity_id: sensor.house_grid_power
    condition:
      - condition: numeric_state
        entity_id: sensor.house_grid_power
        below: -20          # exporting more than 20 W
    action:
      - service: number.set_value
        target:
          entity_id: number.stream2_power_limit
        data:
          # lower the limit by the amount of excess export
          value: "{{ [(states('number.stream2_power_limit')|int
                 + states('sensor.house_grid_power')|int), 0] | max }}"